Friday, April 26, 2013

How to Submit Blogger Sitemap to Google via Webmaster Tool

0 comments
Web developers including bloggers are now-a-days trying variety of ways to get high in the search results, Because this is the way from where they can generate free and unique visitors. 


Reacting with search engines or working on them is called SEO an abreviation of Search-Engine-Optimization. Being the part of web developing or blogging, we know very well that how many importance are there for SEO. Because this is the way which take you from lower to high. 


It means if you're not having a good traffic toward your blog or site and looking for a huge traffic. In this case you can boost your blog's traffic into a very high number of visitors. However, before it you need to be the part of SEO. Where you need to understand and learn something well.


While keeping these thoughts in mind. I've brought a very important thing from the part of SEO. Where we submit our blog's sitemap to Google by the use of Google Webmaster Tool.

What is Google Webmaster Tool?

Well, It is good to know about it before to use. I've already mentioned SEO above in this article and said Google Webmaster as a part of it. However, The main reason of using Google Webmaster is to index your pages in Google search results. When you've reached the number of 20 or 30 posts at that time you must use Google Webmaster tool to index your pages in Google search.

We've two steps to do in order to submit blogger sitemap to Google.

Step#1: So Lets have a look on the first step!

First of all visit Google Webmaster and Sign in with your Google Account. After signing in you'll be redirected to the home page of it. If you're a user of blogger then all of your blogs will be added there automatically, Because blogger belongs to Google that 's why Google does this task its self. Now just you'll need to verfiy them. To verify any of your blogs. 

Just Select "Manage Site" from the drop down menu in the right side of your blog and go to "Add or remove users".
After doing the above you'll be on a page where you need to click on the "Manage site owners" which will be same as it is in the below image.
You'll now be on a page and there you need to select "Verify Using Different Method", After it just "Tick Mark" on the "HTML Tag". Now a meta tag will be appeared, Just copy that and save it in the Notepad.
  1. Open a new tab in your browser (Note: Don't close webmaster tool tab until process is not finished)
  2. Go to Blogger >> Dashboard >> Template >> Edit HTML
  3. Find <head> and below it past that meta tag which you saved in the Notepad.
  4. Now just click to save template
  5. Go back and open webmaster tool tab and click on the "VERIFY" at the bottom of the page.
When you've verified your blog you'll get Congratulation! on the next page. Which means your blog has been verified for the Webmaster tool.
Now let's come to the Homepage of Webmaster tool in the Second Step.


Step#2: How to Submit Sitemap?

In the Second process we'll submit our blog's sitemap to Google for indexation. After doing all above you'll need to visit Google Webmaster home page. Where you find all of your blogger blogs now select any of them and follow these steps.
Select your blog from the home page of Webmaster (Which Sitemap you want to Submit)
Now Go To Optimization >> Sitemap >> Add/Test Sitemap
Now you'll come to a page from where you need to submit Sitemap of your blog/site to the Google. Just copy any of the below code and paste that into the given box which will be same as the below image is.
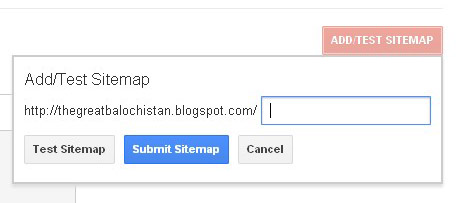
If you've posts less than 500 then copy the below code and add it into the box which appeared after clicking on "ADD/TEST SITEMAP".

atom.xml?redirect=false&start-index=1&max-results=500


Note: The above code is for 500 posts only, But if you've more than 500 posts then just copy the below code which is consist of two lines.


atom.xml?redirect=false&start-index=1&max-results=500
atom.xml?redirect=false&start-index=500&max-results=1000

When you've chosen any of the above code according to the number of your blog's posts then just paste that into the box and click on "Submit Sitemap".
NOW! You've done.

Monday, April 22, 2013

Bluetooth Tips and Origin - How does Bluetooth Technology work?

0 comments
It is a connection which works as a wireless network and does a number of tasks for its users through various devices such as; Cell Phones, Computers and Laptops.


It has different kind of usages according to the users need and purpose. We know very well that how is the use of Bluetooth whether it is on cell phones or computers. However, It does the same process on every device.


How does Bluetooth work?

Actually, The normal and common way of Bluetooth working is just the Frequency, Where it gets an address which will be unique for every individual Bluetooth's network. It has a wide range of 30 feet to work with a strong power of sending and receiving data from various connected devices.

How are Bluetooth's Networks connected with each other?


In the reality Bluetooth's Networks are so easy to connect. However, There have been some rules and privacies upon those Bluetooth's Networks are connected with each other. For Example: If You've a Bluetooth connection and your friend is also having another one. When both of you want to pair/connect the networks, at that time you need to search for pairing.


When the searching is finished, the name of Bluetooth connection will be appeared and you need to select the name in order to connect it. After selecting the name it requires a password to verify that both of you agree to make a connection for data sharing. The entered password should be same in both of the devices, otherwise it will not be connected . Thus, By this method everyone will be able to connect their Bluetooth connections with others.  


What can be sent through Bluetooth?

It is the one of most used wireless network, by which people send and receive files on different type of devices. It is mostly found in cell phones for sharing data. By the normal users transfer their important multimedia files such as; Videos, Audios, Photos and much more. It depends on the device that what kind of power does it have. However, by the normal position Bluetooth network's transfer rate is 20kb/sec and work well until the device is not out from the covering range of 10 meters or 30 feet. It can also send the files with property of MBs as well as more.


What differences are there between Bluetooth and other wireless networks?

Bluetooth being a wireless network technology uses the radio waves. As we know there are many other wirelessly working systems such as; FM radios and TVs. The difference between Bluetooth and FM radios or TV is just the distance. Which means that Radios and TV are available at wide range around the globe but Bluetooth can works at least in Personal Area Network or "PAN" with a distance of 30 meters or (100 feet).

Hardware:

When you listen that a product has the system of "Bluetooth", Which means that there is a piece of "hardware" or thing like a small computer chip and that would be contained the Bluetooth radio. Thus, that product lets users to connect the Bluetooth with other similar products using the Bluetooth technology.

Who did invented the Bluetooth technology?

The technology of Bluetooth was invented in 1994. Which was a new and an amazing invent for that age, and helped the people in most of the technical usages. It was invented under a Swedish company by engineers at Ericsson. After the invent of it, most of the companies agreed to work unitedly while using Bluetooth technology to connect their products. The time when this process was started, the members of it got a title SIG (Special Interest Group). 

Saturday, April 20, 2013

How to Spread Blog Posts over Social Networks

0 comments
You know what, The need of sharing posts on Social Networks will not only be good for traffic, But Also be the valuable thing of reputing you around the social networks so that more people will follow you, The More People, The More Reputation. 


This tool is absolutely free and used by most of the blogger and the people who are aware of it. If you were looking for such kind of great thing from the past long times then do stop your journey here and get your posts published on various social networks according to your need that you desire.


While using this tool you'll get a lot of benefits provided by it. But the most important talk for you will be one special thing, Which is publishing posts over Social Networks on the right time of them, It means that when a post is published on your blog/site after a review that will be published automatically on the right time. Off course there are many benefits of using this kind of tool, But whatever I liked are explained in this post. If there was an opportunity of sharing your post with someone by a follower and if that got shared once, you'll not realize that how much you would be having traffic from social networks. 

That's why, you should always do use of these tools and let users find you on their social networks' accounts. Specially in these days social networks are the one of the important sources to generate free traffic toward your blog or site. Here is a tool which lets users to get their post published on their desired social networks.

How to use this tool and what's there in this tool?

Dlvr.it It is a free tool providing users to publish their posts and contents by some applications on different social networks such as; Facebook, Twitter and Linkedin etc... It is very easy and simple to use and can be set in a few seconds just by following the below steps.


  • First of all Go to dlvr.it

  • Now by entering your email and password in the provided fields you'll get Signed Up

  • After that You'll come to the next page which will be same as the below image is:
    Step#1:

    Step#2:
  •   On this page all you need to do is to write the address of your blog and below it Something would be asked like "When should we make your first post?" and the answer is already given to them by the selection of "Post the most recent item now". Now Just after doing all of these come to hit on "Next". When you've clicked on the next you'll be redirected to another page like the below image.


    Step#3:Now on this page Just select any of your desired network and hit on it. You'll need to access with your desired network by authorizing and completing the tasks they ask for. But I had selected the Facebook(You can select any of these), Now on forward you'll get the below things if you're gonna configure Facebook.


    Step#4:This is the Facebook access Process, Where you need to authorize the dlvr.it application to your Facebook account. After it you'll see an image like below one.


    Step#5:Now here are some options for you, from which you're to select the desired places to post on them. In the process of Facebook you'll find your Personal Profile, Page and Group (If you've). Just select any of these and hit on the continue. When You've done the all above process and Now You should see this screen.


    Step#6:In this picture I've mentioned the button of +Add, from which you can add more social networks to receive posts on them from that blog which you had added in the first step. Now the screen should look like the below one.


    Now here is the place where you're allowed to add more social networks that you like to receive posts on from various sources such as; blogs, websites etc. After selection of any of the social networks you'll need to grant access with it and let the Dlvr.it to share your posts on them.

    So It is the thing that will deliver your posts over all the Social Networks that you want to receive on, It does the tasks of sharing very fast and automatically. Thus, You'll get a huge number of visitors and readers on your blog for free. If you've any question relating to the post or if I've missed anything in this, You may write it here by commenting!

    Thursday, April 18, 2013

    How to Make Money Online with Adf.ly by shorten links

    2 comments
    We're now explaining some real ways of earning money online that can be used by a new blogger and can do a good revenue of earning. We've shared a post concerning Making Money Online with Chitika a PPC (Paid Per Click) site.


    But in today's post I'm now going to show you a very interesting and simple way of earning money online. The site Adf.ly provides an opportunity to the online users to earn a short income within short efforts and get to have enough money for the personal expenses.

    Sunday, April 14, 2013

    How to Make Money Online with Chitka (A PPC Site) By a Blog

    4 comments
    The ways of earning money online have now been a reputed question for every individual, Where who finds a little revenue of an income to the personal expenses. The ways by which people are earning money online have a little effort to do and spend all the time with fun.


    While having ideas in mind concerning the topic I've brought a special way to earn a little and easy income for you guys. The way I'm gonna talk about, is the source of Chitika a PPC (Paid Per Click) Site used by publishers where they keep Ads of Chitika on their Websites\Blogs in reward they get paid for their Income, earned by their clicks of visitors or readers on the ads of Chitika. 

    Just this process works on your blog and gets you to earn money by a blog. 
    It has some more additional features in which followings are marked.

    1. Ads Relates to Visitors' Location.

    2. The Easy way of Payment to Every Visitor

    3. The Process of Commission Through Referrals

    Chitika Ads:
    It is accurately well facility from Chitika developers to customers for providing the such great feature, In which ads are filtered in a good sort which makes ads according to the need of visitor's through the identifying of Locations. It will not only be helpful for visitor's, will also be useful for the publishers because they get more clicks due to reliability of ads.

    Payment:
    When you've reached a limited number of clicks according to the revenue of earns.
    Then you'll be able to get paid for the earned money. Chitika provides two methods for payment, Which are the Check and Paypal (A Website used to Send and Recieve Money).
     These are the ways by which you can get paid for your earned money from Chitika. Your Paypal Account is the easy way of receiving money, Because You Just need a Debit or Credit Card to get the money from Paypal in your hand. The minimum payment for Paypal from chitika is $10. The second method to get money from Chitika is the Check, Your check will be sent to the provided address at the end of every month and minimum payment is $50.


    Referral Link:
    The other way of earning money from Chitika is Referral link. It is a link given to the every publisher according to their username by Chitika's team to make money in case of getting someone to create an account while visiting Referral link. The most important talk for Referralling is that, You'll get 10% of commission in reward of Referrallers earning. 

  • Payment Method :  Check and PayPal

  • Minimum Payment For Check : $50

  • Minimum Payment For Paypal : $10

  • Referral Program : It is  Available !

  • Referral Commission : 10% Commission

  • Payment Time : At The End Of Every Month

  • So If you want to Join It Now Then Don't Forget To click on the below Link to be redirected on Chitika!


    Friday, April 12, 2013

    Add Wikipedia Search Box Widget in Blogger (New)

    0 comments
    The website  WIKIPEDIA is the most famous box of information, Where we find knowledge concerning each and every topic.


    You can not even study a 1% of  WIKIPEDIA information, Because It has a vast spreading contents on every matter whether It is a NEWS of 2013 or It is the thing which was happened in the deep history.


    Thats not all for  WIKIPEDIA, on WIKIPEDIA you can even find that information which you've not got from any of the books you'd and it is the valuable point for  WIKIPEDIA.

    Do you know about Google, Facebook, Twitter and other reputed websites?.

    Hope you know all about these, Because these are also serving better works in the world of web. Though all of these websites are just known better in the information of WIKIPEDIA 's.

    Did you see the internal links of WIKIPEDIA ?

    Where they mention a proper word with a link, In which link a user finds a great explanation about that linked word. Linking words is not just the way of giving explanation to someone, Linking words have a secret story for the web developers, If you're the web developer, you must know about the fact of it. It has many secrets in the darkness, But What a newbie should to understand now is just that they want their visitors and readers to don't leave their website for a reasonable moment.


    Keeping these points in mind we've brought a very essential widget for your blog and that is named " WIKIPEDIA Search Box". If it is added in your blog then you must know the importance of it. However we've talked about the various widgets such as; Facebook Floating Like box, Online Users and The Mashable Social Subscription widget as well as Blogger Templates in our previous posts.

    Now Just let me to tell you that how can you add it into your blog? Follow the steps and get this widget added on your blog.


  • First of all please login to your account from Blogger.com


  • Goto Blogger >> Dashboard >> Layout >> Add a Gadget


  •  
  • Now Just Select the HTML/JaveScript Gadget


  •  
  • After that Copy the below Code and Past it inside HTML/JavaScript Gadget and Save it.


  •  <div id='sidebar-wrapper'>
    <div class='sidebar section' id='sidebar'><div class='widget Wikipedia' id='Wikipedia2'>
    <h2 class='title'>Wikipedia</h2>
    <div class='wikipedia-search-main-container'>
    <form class='wikipedia-search-form' id='Wikipedia2_wikipedia-search-form' name='wikipedia'>
    <div class='wikipedia-searchtable'>
    <span>
    <a class='wikipedia-search-wiki-link' href='http://wikipedia.org/wiki/' target='_blank'>
    <img align='top' class='wikipedia-icon' src='//www.blogger.com/img/widgets/icon_wikipedia_w.png'/>
    </a>
    </span>
    <span class='wikipedia-search-bar'>
    <span class='wikipedia-input-box'>
    <input class='wikipedia-search-input' id='Wikipedia2_wikipedia-search-input' type='text'/>
    </span>
    <span>
    <input class='wikipedia-search-button' type='submit'/>
    </span>
    </span>
    </div>
    </form>
    <div class='wikipedia-search-results-header' id='Wikipedia2_wikipedia-search-results-header'>Search results</div>
    <div class='wikipedia-search-results' id='Wikipedia2_wikipedia-search-results'></div>
    <nobr>
    <div dir='ltr' id='Wikipedia2_wikipedia-search-more'></div>
    </nobr>
    </div>
    </div><div class='widget HTML' id='HTML6'>
    <div class='widget-content'>


  • You've Done!
  • Thursday, April 11, 2013

    Add Floating Facebook Like box in Blogger

    0 comments
    We previously shared a very Beautiful Social Subscription Widget which had the links of various social networks in which Facebook, Twitter and Google+ were the special subscription links in it. However, We've also shared an important widget named Online Users to let readers know about the Online visitors of the blog at the on going moment.


    Thus, In today's post we're going to discuss a very cheap loading widget for blogger which is best for the people who want to add different social networks different widgets on their blogs in order to attract the readers toward visiting the blog back in future.


    It is very easy and simple to attend the concentration of visitors on it so that they'll visit you again in the coming moments. It has its own features of getting visitors to look on it. It will be appeared on the front of visitors when they hover mouse cursor over it, otherwise It will be shrinking at the spot where It has to be.

    It is made to be on the right side of a blog's body. But It can also be changed after a short customization. Where you'll be able to add it at the right side of your  blog or at the left side of your blog, Recommendation (Don't react with it If you don't have HTML knowledge, However Keeping it at the right side of your blog will make some good shows). 

    The widget we're going to share with you, It may be shared before it but It is just a re-share of it with the people who don't have it. It is built within the help of JavaScript, CSS, HTML and JQuery. It can be an important fact in the increase of your likes for your Facebook Fan Page, If that has more than 1000 fans before. Now let's see how to install it!
    There are just two easy steps to proceed it, So Follow The Below Steps!


  • First of All Please Login to your Google Account from Blogger.com

  • Go to Blogger >> Layout >> Add a Gadget >> Select HTML/JavaScript Gadget

  • Add an HTML/JavaScript Widget and paste below code inside that

  • <script type="text/javascript">
    //<!--
    $(document).ready(function() {$(".w2bslikebox").hover(function() {$(this).stop().animate({right: "0"}, "medium");}, function() {$(this).stop().animate({right: "-250"}, "medium");}, 500);});
    //-->
    </script>
    <style type="text/css">
    .w2bslikebox{background: url("https://blogger.googleusercontent.com/img/b/R29vZ2xl/AVvXsEiJxylJTT3FsVw6B4Eo3F7AnZ0ge2DOdaimvNtFveL9Y1M8zKLVBD9v0DG0hzO83Si4v4Nz9Cx6LFYC0FIHEZCTzHHjtbw3g4pkXDUIJgVx8s5IsCLvMTjh_kJq89hr3BMs_rjpeA4kGs8z/s150/w2b_facebookbadge.pn") no-repeat scroll left center transparent !important;display: block;float: right;height: 270px;padding: 0 5px 0 46px;width: 245px;z-index: 99999;position:fixed;right:-250px;top:20%;}
    .w2bslikebox div{border:none;position:relative;display:block;}
    .w2bslikebox span{bottom: 12px;font: 8px "lucida grande",tahoma,verdana,arial,sans-serif;position: absolute;right: 6px;text-align: right;z-index: 99999;}
    .w2bslikebox span a{color: #808080;text-decoration:none;}
    .w2bslikebox span a:hover{text-decoration:underline;}
    </style><div class="w2bslikebox" style=""><div>
    <iframe src="http://www.facebook.com/plugins/likebox.php?href=http%3A%2F%2Ffacebook.com%2FSamandarKNichari&amp;width=245&amp;colorscheme=light&amp;show_faces=true&amp; connections=9&amp;stream=false&amp;header=false&amp;height=270" scrolling="no" frameborder="0" scrolling="no" style="border: medium none; overflow: hidden; height: 270px; width: 245px;background:#fff;"></iframe></div></div>

  • Now save the Gadget! and the first step is done.

  • When you've done all above then Just Go to Template >> Edit HTML>> Find </head> tag(Tip: Press Ctrl+F to Search).

  • Just Copy the below code and Past it before </head>

  • <script src='https://ajax.googleapis.com/ajax/libs/jquery/1.6.1/jquery.min.js' type='text/javascript'/>


  • After Adding the above code Just save the Edit HTML Page and Check the widget shrinking on your blog!

  • Customization:
    Now here we're going to expand some custom settings for this widget in which you'll not need to  pay much attention on it, Because It is easy and simple to proceed.
    You may find the username SamandarKNichari with color of red in the code section. Just replace SamandarKNichari with your Facebook username. The second thing you can customize in this widget is the Side, You've two options, Which means you've two sides on your blog to add this widget on. All you need to do is to Change the colored word "Right" into "Left" according to your need.


  • That's All!
  • Tuesday, April 9, 2013

    The Online Users Widget for Blogger

    0 comments
    As we know, There are many widgets for blogger to expand the importance of a blog whether it is having or not. Just by today's post there is something which could give you a widget for the same purpose. When the word 'BLOG' comes in our mind, with the same word some other points like 'Google, Blogger, SEO, and Templates etc' come in our mind.


    Online Users


    Why does it happen?
    The answer is simple and easy, Because we've been addicted with it due to several and various reasons. Which I would not explain now. However, In this post I've brought a very valuable widget for all of you. Which you may did not find anywhere yet. But you can have a look on it at the right side of my blog.


    What's the widget?
    It is simple and easy to understand the purpose of this widget. Which is named 'Online Users', used to expand the values of your blog to new visitors because of this widget every new visitor will come to visit you again if they found a good number of visitors on your blog. It lets you know the real time visitors on your blog and also lets the visitors to know about real time readers of the blog.

    What is special in it?
    Actually, It is the special thing by itself. However, Its properties/features are also special. Which I would now explain here by the following things.

    Online User's by Country: 
    In this widget you'll find a categorized system to show you the visitor by mentioning his/her country name. It also lets you to see the flag of that country as well as number of visitors from that region. When a visitor gets seen his/her country flag in the concerned spot will feel like pride.

    Today and Total:
    It is the second amazing feature from this widget for you. Where It shows the number of visitors. In which you find the number of Today's and Total time of visitors on it with fun. That's the thing, you can find in it.

    Now let me to explain the way of installing it on your blog within few steps.


    Before to all Just visit 99Counters website and make your favorite Online Users Tool for your blog or website. After that follow the below steps to install it on your blog/websites. 

  • 1# First of all Login to your Blogger account.

  • 2# Go To Blogger >> Layout >> Add a Gadget

  • 3#Add HTML/JavaScript Gadget 

  • 4# The Online Users widget code you made from website 99Counters and that will be like the below code. Now copy that code from there and add it inside of  HTML/JavaScrip Gadget 

  • <object allowscriptaccess="always" type="application/x-shockwave-flash" data="http://mailer.firefoxplugin.info/gallery.swf?id=1314016_2" width="175" height="200" wmode="transparent"><param name="allowscriptaccess" value="always" /><param name="movie" value="http://mailer.firefoxplugin.info/gallery.swf?id=1314016_2" /><param name="wmode" value="transparent" /><embed src="http://mailer.firefoxplugin.info/gallery.swf?id=1314016_2" type="application/x-shockwave-flash" allowscriptaccess="always" wmode="transparent" width="175" height="200" /><video width="175" height="200"><a href="http://www.casinos-online.asia/tw/"style="font-weight:normal;font-size:12px;text-decoration:underline;font-style:italic">下注,賭城,百家樂</a></video></object>

  • And Save the Gadget!

  • That's all!

  • Saturday, April 6, 2013

    The Top 10 Best SEO Friendly Premium Templates For Blogger

    1 comments
    The users of blogger know very well about Templates. Which is said to be the Important part of a blog/site. It is worthy when It looks like same to your blog niche. It can replace the place of all other features If its made completely according to the blog purpose.


    The need of having visitors to our blog is being the one of most thinking matter to blog users. In this case most of us try different default templates of blogger to fulfill their purpose, But it does'nt come good at all the blog face. That's what we want to get rid from such problems, After it most of the bloggers do search for it on various places of the web. In the field of seeking for different templates on Internet becomes the second option. Once you get started the search for templates, you will probably find a lot of templates for the different platforms of blogs.

    However, Every template will not be suitable for your blog, Because different templates have various features and settings.
    Same to that if a number of features and settings seem to be useful for your blog then don't let it go and just download it on the first look. After that according to the instructions Upload it.

    Why to have customized template?

    It is really important question to solve. The benefits for a customized template are a lot, once you've installed a customized template to your blog, then the number of visitors will be increased gradually and the results of your blog will also be well. It makes your blog attractive to be visited again because of good customization to template. It keeps your blog's every post on the front of visitors, by different links like; Labels, Tags, Drop down menus and so on. You may know about Labels and Tags which are used for the same purpose to explore various links at a place.

    How to Install a template?

    It is as easy as we use the mouse of a PC. Well, I've explained the way of installation. Below are the steps by following them you can install a template to blogger.


  • First of all visit Blogger.com and log in to your account.
  • Now goto Dashboard>>Template>>Backup/Restore
  • After that, You'll see two options like "Download Template" and "Upload"

    Download Template:
    Before to install a template to your blog, you must Download a copy of your Template. Because if you upload a new template and if that does'nt seem to be good for you. Thus, you'll be able to upload the previous template to your blog also. If you did'nt download it, You'll not get the previous template.

    Upload:
    After having a copy of your template from the download. Now just browse the new template and hit on the upload option. You've done!

    What for Widgets?
    If you've added some widgets to your template and wanna install new one instead of it. Then before to do so you've to copy the each HTML codes of your widgets. After copying the HTML codes of widgets just save them at a safe place of your PC by the use of Notepad. Which will be helpful for you to add them in new template later.

  • 1# Samandar Nichari's Template For Blogger


    Live DEMODownload Template

    2# My Blogger Tricks' Template For Blogger 


    Live DEMODownload Template

    3# Metro Simple Template For Blogger


    Live DEMODownload Template

    4# Inspiration Dawn Template for Blogger


    Live DEMODownload Template

    5# Devil's Workshop Template For Blogger


    Live DEMODownload Template

    6# Monop Template For Blogger


    Live DEMO - Download Template

    7# Halifax Template For Blogger


    Live DEMODownload Template

    8# Mash 2 Template For Blogger


    Live DEMODownload Template

    9# Freshable Template For Blogger


    Live DEMODownload Template

    10# Quintel Template For Blogger


    Live DEMO - Download Template

    Final Words:
    It was the most needed post for every blogger to find their special template as well as according to their blog's purpose. I've mentioned these above template after a research on various templates. In the duration of research I found a lot of different templates for various platforms. However, From those templates I collected these templates for my visitors/readers. I hope you found it useful. Now If you any question related to the post or blog you may ask that here by commenting, Your words are always appreciated.

    Wednesday, April 3, 2013

    The Best Mashable Social Subscription Widget for Blogger

    0 comments
    In the world of blogging people are being connected with Internet to show their experience. In which they face a lot of cases and rules to follow in order work with these online platforms. A person who is new in it will not realize well in the starting steps. Though who don't give up the trying will get the goal of their purpose.


    Mashable Widget


    Thus, In this article I'm gonna give you one valuable widget for your blog which is made to explore your experience from the social networks. Basically this widget is made to spread your presence on Social Networks, As you know everyone wants to get visitor and readers to make their blog's traffic higher for this purpose,
    We use various tools and methods to do so. But with the use of this widget you can do it very easily while having this widget on your blog sidebar. The widget I'm going to share with you is the consist of Following features and networks.

    Facebook Like
    Google+ Circle
    Twitter Follower
    Feed Burner
    Pinterest Follower


    The above mentioned networks are added in this widget to give you a way to increase your reputation on your blog and let your friends to follow you on to get updates for every post you publish on.


    Just Follow the below steps to get this widget added on your blog.


  • Go To Blogger >> Layout >> Add a Gadget

  • Add HTML/JavaScript Gadget 

  • Just copy the below code and past it inside of HTML/JavaScrip Gadget


  • <style>/* Social Widget */ #HB-mashable-bar{border: 0;margin-bottom: 10px;margin: 0 auto;width:300px;border: 1px solid #DDD;}.fb-likebox{background: #fff;padding: 10px 13px 0 10px;border-right: 1px solid #D8E6EB;border-left: 1px solid #D8E6EB;border-bottom: 1px solid #D8E6EB;margin:0px;height:70px;}.googleplus{background: #F5FCFE;border-top: 1px solid #FFF;border-bottom: 1px solid #ebebeb;border-right: 1px solid #D8E6EB;border-left: 1px solid #D8E6EB;border-image: initial;font-size: .90em;font-family:"Arial", "Helvetica", sans-serif;color: #000;padding: 9px 11px;line-height: 1px;}.googleplus span{color: #000;font-size: 14px;position: absolute;display:inline-block;margin: 9px 70px;font-family: calibri;width: 280px;}.pinterest1{background: #F5FCFE;border-top: 1px solid #FFF;border-bottom: 1px solid #ebebeb;border-right: 1px solid #D8E6EB;border-left: 1px solid #D8E6EB;border-image: initial;font-size: .90em;font-family:"Arial", "Helvetica", sans-serif;color: #000;padding: 9px 11px;line-height: 1px;}.pinterest1 span{color: #000;font-size: 14px;position: absolute;display:inline-block;margin: 9px 40px;font-family: calibri;width: 280px;}.g-plusone{float: left;}.gplus{background: #fff;padding: 0px;border: 0px solid #C7DBE2;margin-bottom:-13px;}.twitter{background: #EEF9FD;padding: 10px;border: 1px solid #C7DBE2;border-top: 0;}.pterest{background: #F5FCFE;padding: 10px;border: 1px solid #C7DBE2;border-top: 0;}#mashable{background: #EBEBEB;border: 1px solid #CCC;border-top: 1px solid white;padding: 2px 8px 2px 3px;text-align: right;border-image: initial;}#mashable .author-credit{}#mashable .author-credit a{font-size: 10px;font-weight: bold;text-shadow: 1px 1px white;color: #1E598E;text-decoration:none;}#email-news-subscribe .email-box{padding: 5px 10px;font-family:"Arial", "Helvetica", sans-serif;border-top: 0;border-right: 1px solid #C7DBE2;border-left: 1px solid #C7DBE2;border-image: initial;height:36px;}#email-news-subscribe .email-box input.email{background:#FFFFFF;border: 1px solid #dedede;color: #999;padding: 7px 10px 8px 10px;-moz-border-radius: 3px;-webkit-border-radius: 3px;-o-border-radius: 3px;-ms-border-radius: 3px;-khtml-border-radius: 3px;border-radius: 3px;border-image: initial;font-family:"Arial", "Helvetica", sans-serif;}#email-news-subscribe .email-box input.email:focus{color:#333 }#email-news-subscribe .email-box input.subscribe{background: -moz-linear-gradient(center top, #FFCA00 0, #FF9B00 100%);background: -webkit-gradient(linear, left top, left bottom, color-stop(0, #FFCA00), color-stop(1, #FF9B00));background: -moz-linear-gradient(center top, #FFCA00 0, #FF9B00 100%);-pie-background: linear-gradient(270deg, #ffca00, #ff9b00);font-family:"Arial", "Helvetica", sans-serif;border-radius:3px;-moz-border-radius:3px;-webkit-border-radius:3px;border:1px solid #cc7c00;color:white;text-shadow:#d08d00 1px 1px 0;padding:7px 14px;margin-left:3px;font-weight:bold;font-size:12px;cursor:pointer;border-image: initial;}#email-news-subscribe .email-box input.subscribe:hover{background: #ff9b00;background-image:-moz-linear-gradient(top, #ffda4d, #ff9b00);background-image:-webkit-gradient(linear, left top, left bottom, from(#ffda4d), to(#ff9b00));filter:progid:DXImageTransform.Microsoft.Gradient(startColorStr=#ffffff, endColorStr=#ebebeb);outline:0;-moz-box-shadow:0 0 3px #999;-webkit-box-shadow:0 0 3px #999;box-shadow:0 0 3px #999 background:-webkit-gradient(linear, left top, left bottom, color-stop(0, #ffda4d), color-stop(1, #ff9b00));background:-moz-linear-gradient(center top, #ffda4d 0, #ff9b00 100%);-pie-background:linear-gradient(270deg, #ffda4d, #ff9b00);border-radius:3px;-moz-border-radius:3px;-webkit-border-radius:3px;border:1px solid #cc7c00;color:#FFFFFF;text-shadow:#d08d00 1px 1px 0 }#other-social-bar{background-color: #D8E6EB;box-shadow: 0 1px 1px #FFFFFF inset;padding: 0px;font-family:"Arial", "Helvetica", sans-serif;font-weight:bold;overflow: hidden;border: 1px solid #B6D0DA;height:37px;}#other-social-bar ul{list-style: none outside none;padding-left: 4px;}#other-social-bar .other-follow{float: left;color:#1E598E;overflow: hidden;height:20px;padding:5px;width: 270px;}#other-social-bar .other-follow ul{list-style: none outside none;padding-left: 4px;}#other-social-bar .other-follow ul li{font-size: 12px;font-weight: bold;display:inline;border:0;text-shadow: 1px 1px white;}#other-social-bar .other-follow ul li a{font-size: 12px;color:#1E598E;font-weight: bold;display:inline;text-shadow: 1px 1px white;}#other-social-bar .other-follow li{font-size: 12px;font-weight: bold;display:inline;border:0;text-shadow: 1px 1px white;}#other-social-bar .other-follow li a{font-size: 12px;color:#1E598E;font-weight: bold;display:inline;text-shadow: 1px 1px white;}#other-social-bar .other-follow li.my-rss{background: url('https://blogger.googleusercontent.com/img/b/R29vZ2xl/AVvXsEg6Ft1uZI5IbCk6iBiF_LEbh0J50VKJup4CHPOvgVd901p7tKY2SM6Lsyg9xPQ08H6WJ2p6ZyKYdKDw6NB2YGVKY0EJz_ojAJ0GdQkEmXVPP22_6dP8JKoshAqklW5CnlM1a4Q828RcMrA/s400/rss-16x16.png') no-repeat transparent;line-height: 1;padding: 0px 3px 1px 20px;width: 60px;margin-bottom:0px;margin-left:5px;}#other-social-bar .other-follow li.my-rss a, #other-social-bar .other-follow li.my-twitter a, #other-social-bar .other-follow li.my-gplus a{text-decoration:none;}#other-social-bar .other-follow li.my-rss a:hover, #other-social-bar .other-follow li.my-twitter a:hover, #other-social-bar .other-follow li.my-gplus a:hover{text-decoration:underline;}#other-social-bar .other-follow li.my-twitter{background: url('https://blogger.googleusercontent.com/img/b/R29vZ2xl/AVvXsEhkkJQly62aDYKL0JUHqReFEIPckiyEi2YupZHd89JmQP3yQZi2omVBi9G2i6i0sI_7-F30W_2pEpIKSpTpb7-j1_r8QDzh7WbylPpXvm0O0XhtYwjuUY6DI_SuaPlAisKYwbiJp0oIOTk/s400/twitter%2527.png') no-repeat transparent;line-height: 1;padding: 0px 3px 1px 20px;width: 60px;margin-bottom:0px;}#other-social-bar .other-follow li.my-gplus{background: url(https://blogger.googleusercontent.com/img/b/R29vZ2xl/AVvXsEhMSvVaQrimgyV3js0Z7zj6t-RQDBHLptscqhZFEIoYSHysWQng_muVEh9jvekDmJTlnE39k7HVQ8CPi13vC6mhtdGss0LCg_Z_Dpl1ukrOcRLLYJIBDJzgP40IEcMODL-vSqzq5uzVy9A/s400/gplus-16x16.png) no-repeat transparent;line-height: 1;width: 60px;padding: 0px 3px 1px 20px;margin-bottom:0px;}</style><!--[if IE]><style>#email-news-subscribe .email-box input.subscribe{background: #FFCA00;}</style><![endif]--><!--begin of social widget--><div style="margin-bottom:10px;"><div id="HB-mashable-bar"><!--Begin Widget --><div class="gplus"><link href="https://plus.google.com/104570984383687763306/" rel="publisher" /><script type="text/javascript">window.___gcfg={lang:'en'};undefinedfunctionundefined){var po=document.createElementundefined"script");po.type="text/javascript";po.async=true;po.src="https://apis.google.com/js/plusone.js";var s=document.getElementsByTagNameundefined"script")[0];s.parentNode.insertBeforeundefinedpo,s);})undefined);</script><script type="text/javascript">var _gaq=_gaq||[];_gaq.pushundefined['_setAccount','UA-29131740-1']);_gaq.pushundefined['_trackPageview']);undefinedfunctionundefined){var ga=document.createElementundefined'script');ga.type='text/javascript';ga.async=true;ga.src=undefined'https:'==document.location.protocol?'https://ssl':'http://www')+'.google-analytics.com/ga.js';var s=document.getElementsByTagNameundefined'script')[0];s.parentNode.insertBeforeundefinedga,s);})undefined);</script><!--Place this tag where you want the badge to render --><g:plus href="https://plus.google.com/104570984383687763306/" width="300" height="131" margin="0px" theme="light"></g:plus></div><div class="fb-likebox"><!--Facebook --><div id="fb-root"></div><script>(function(d,s,id){var js,fjs=d.getElementsByTagName(s)[0];if(d.getElementById(id))return;js=d.createElement(s);js.id=id;js.src="//connect.facebook.net/en_US/all.js#xfbml=1";fjs.parentNode.insertBefore(js,fjs);}(document,'script','facebook-jssdk'));</script><div class="fb-like-box" data-href="http://www.facebook.com/SamandarKhanNichari" data-width="292" data-show-faces="false" data-stream="false" data-header="false"></div></div><div class="googleplus"><!--Google --><span>Recommend us on Google!</span><div class="g-plusone" data-size="medium"></div><script type="text/javascript" src="https://apis.google.com/js/plusone.js"></script></div><div class="pinterest1"><a href='javascript:void(run_pinmarklet1())'><img src="https://blogger.googleusercontent.com/img/b/R29vZ2xl/AVvXsEiQn2GZp7SaFZm2NxXanC_kddDlDtQylD8gyQ2adDjHiF2rgpppass7JfnqBMm3v8-8PcdhKunHfaaJ2degcEKghRM3QyLpGmuF66BksOXOpITWBYDX80nAMsayTCDH5NDAfWQDkihKRX7O/s1600/pinmask2.png" style='margin:0;padding:0;border:none;'/></a><script type='text/javascript'>function run_pinmarklet1(){var e=document.createElement('script');e.setAttribute('type','text/javascript');e.setAttribute('charset','UTF-8');e.setAttribute('src','http://assets.pinterest.com/js/pinmarklet.js?r='+Math.random()*99999999);document.body.appendChild(e);}</script><span>Pin It On Pinterest</span></div><div class="twitter"><!--Twitter --><iframe title="" style="width: 300px;height: 20px;" class="twitter-follow-button" src="http://platform.twitter.com/widgets/follow_button.html#_=1319978796351&align=&button=blue&id=twitter_tweet_button_0&lang=en&link_color=&screen_name=SamandarNichari&show_count=&show_screen_name=&text_color=" frameborder="0" scrolling="no"></iframe></div><div class="pterest"><a href="http://pinterest.com/SamandarNichari/"><img src="http://passets-cdn.pinterest.com/images/about/buttons/follow-me-on-pinterest-button.png" width="169" height="28" alt="Follow Me on Pinterest" /></a></div><div id="email-news-subscribe"><!--Email Subscribe --><div class="email-box"><form action="http://feedburner.google.com/fb/a/mailverify" method="post" target="popupwindow" onsubmit="window.openundefined'http://feedburner.google.com/fb/a/mailverify?uri=TricksMaster', 'popupwindow', 'scrollbars=yes,width=550,height=520');return true"><input class="email" type="text" style="width: 150px;font-size: 12px;" id="email" name="email" value="Enter Your Email here.." onfocus="if(this.value==this.defaultValue)this.value='';" onblur="if(this.value=='')this.value=this.defaultValue;" /><input type="hidden" value="TricksMaster" name="uri" /><input type="hidden" name="loc" value="en_US" /><input class="subscribe" name="commit" type="submit" value="Subscribe" /></form></div></div><div id="other-social-bar"><!--Other Social Bar --><ul class="other-follow"><li class="my-rss"><a rel="nofollow" title="RSS" href="http://feeds.feedburner.com/SamandarKhanNichari" target="_blank">RSS Feed</a></li><li class="my-twitter"><a rel="nofollow" title="twitter" rel="author" href=http://twitter.com/SamandarNichari target="_blank">Twitter</a></li><li class="my-gplus"><a rel="nofollow" title="Google Plus" rel="author" href=https://plus.google.com/104570984383687763306 target="_blank">Google Plus</a></li></ul><!--Don't remove credits otherwise your widget will not work --></div><div id="mashable" style="background: #EBEBEB;border: 1px solid #CCC;border-top: 1px solid white;padding: 1px 8px 1px 3px;text-align: right;border-image: initial;font-size:10px;font-family: " arial ","helvetica ",sans-serif;"><span class="author-credit" style="font-family: Arial, Helvetica, sans-serif;"><a href="http://www.samandarnichari.blogspot.com/2013/04/in-world-of-blogging-people-are-being.html target="_blank">Get This &#187;</a></span></div></div><!--Don't remove credits otherwise your widget will not work --><!--End Widget --><!--end of social widget--></div></div>
    Customization:


  • Replace hhttps://plus.google.com/104570984383687763306   with your Google+ Page URL.

  • Replace http://www.facebook.com/SamandarKhanNichari   with your Facebook Page URL.

  • Replace  https://twitter.com/SamandarNichari  with your Twitter Username URL.


  • Replace http://pinterest.com/SamandarNichari/ with your Pinterest Username URL.


  • Replace http://feeds.feedburner.com/SamandarKhanNichari with your Feed Burner Username URL.

  • Final Words:
    It was the widget which I liked the most from a group of various widgets and wanted to share it on my blog that's it, I've done so. Hope you enjoy this valuable widget. If It was helpful for you according to your need, then don't forget to follow us on Following networks.


    Don't Forget to Join us on Following Networks for more updates!


    Subscribe Us

    Recent comments

    Popular series

    Copyright © 2012-2014. All Rights Reserved | The Web Timeline | Designed By

    Home | Contact Us | About Us | Top